Sharp SD-AT1000W Spécifications Page 247
- Page / 292
- Table des matières
- MARQUE LIVRES
- TECHNICALMANU AL 1
- 888‐2693‐004 1
- Maxiva™UAX 1
- TransmitterSeries 1
- Harris Broadcast 2
- Englewood, CO 80112 U.S.A 2
- ManualRevisionHistory 3
- TechnicalAssistance 4
- ReplaceablePartsSer v ice 4
- Unpacking 4
- ReturnsAndExchanges 4
- PARTS ORDER FORM 5
- WARNING: 7
- FIRST‐AID 9
- Table of Contents 11
- Section-1 Introduction 15
- 1.3 UAXGeneralDescription 16
- 1.4 TransmitterModels 16
- 1.5.1 LowPowerUnit 20
- 1.5.1.3 LPUAmplifierSection 21
- Figure 1-7 PAB - Rear 22
- 1.7 TransmitterAccessories 25
- Figure 1-10 UAX With Plenum 26
- 1.8 UAXSpecifications 27
- 1.8.4 AnalogSpecifications 34
- Section-2 Installation 43
- 2.6 ACMainsRequirements 44
- 2.5 OperatingEnvironment 44
- 2.7 GroundRequirements 46
- 2.9 InstallationProcedure 48
- Procedurecomplete 52
- Table2‐3ReferenceInputs 53
- Table2‐4AnalogConnections 53
- +12Vdc,200mAmax 58
- Alarm2RelayCommon 58
- 2.14.1 SNMPConfiguration 66
- Table3‐2StatusLEDs 70
- FORWARD1259W(ForwardPower) 73
- 3.4 GUIInterface 77
- 3.5 TCUScreens 79
- 3.5.3.2 ReflectedPower 83
- 3.6 LPUSystemLevelScreens 88
- 3.6.1 LPUHomeScreen 89
- Figure 3-23 LPU PA’s 90
- .See"5.4.5 94
- 3.7 LPUSetupScreens 98
- ≈10.0000107MHz.(high) 100
- Maxiva UAX 101
- October 17, 2013 101
- Section-3 Operation 102
- LongOffset,Max 104
- isanoptionalfrequency 117
- Displayedinpercent 134
- (Screen3) 136
- (Screen4) 138
- (Screen5) 138
- 3.8 LPUStatusScreens 141
- Section-4 Theory 165
- 4.2.2 TransmitterRS‐485Bus 166
- 4.2.3.4 CustomerIOCard 169
- 4.2.3.5 OtherTCUComponents 169
- 4.3 LowPowerUnit(LPU) 171
- arerequired 174
- 4.4 LPUAmplifierSection 178
- 4.4.2 MultiplexedDevices 179
- 4.5.1 PowerAmplifierModule 179
- 4.5.2 PowerSupplyModule 179
- Section-5 Maintenance 181
- changeisnotrequired) 182
- 5.3.3 ChangingPasswords 184
- inthe 188
- 5.4.2.1 CalibrationErrors 189
- inyour 190
- 5.4.4.1 CalibrationErrors 192
- 5.4.6 CalibrateLPUOutput 193
- 5.4.7 CalibratingPABPower 193
- • SpectrumorTVanalyzer 195
- 5.5.2 StoringPrecorrection 196
- 5.6 AnalogPowerCalibrations 199
- 5.6.2.3 CalibrationErrors 207
- 5.6.4 CalibrateUDCOut 210
- onAnalogSetupscreen1 211
- 5.6.6 CalibratingPABPower 212
- toachieve300mV(40IRE). 213
- 5.8 TCUMaintenance 215
- 5.8.3 DateandTimeSettings 216
- 5.8.5 TCUCardReplacement 217
- 5.8.6 PCM‐2CardReplacement 218
- 5.8.7 MCMCardReplacement 219
- 5.8.9 TCUAirFilters 221
- 5.9 LPUMaintenance 222
- 5.9.2 LPUFilterReplacement 223
- 5.9.6 LPUCleaning 225
- 5.9.11 LPUScreenCaptures 233
- 5.9.16 LPUCoaxialRelay 240
- 5.10 PABMaintenance 241
- 5.10.2 PAModuleInstallation 243
- 5.10.4 PAModuleBias 244
- 5.10.5 PAModulePhasing 244
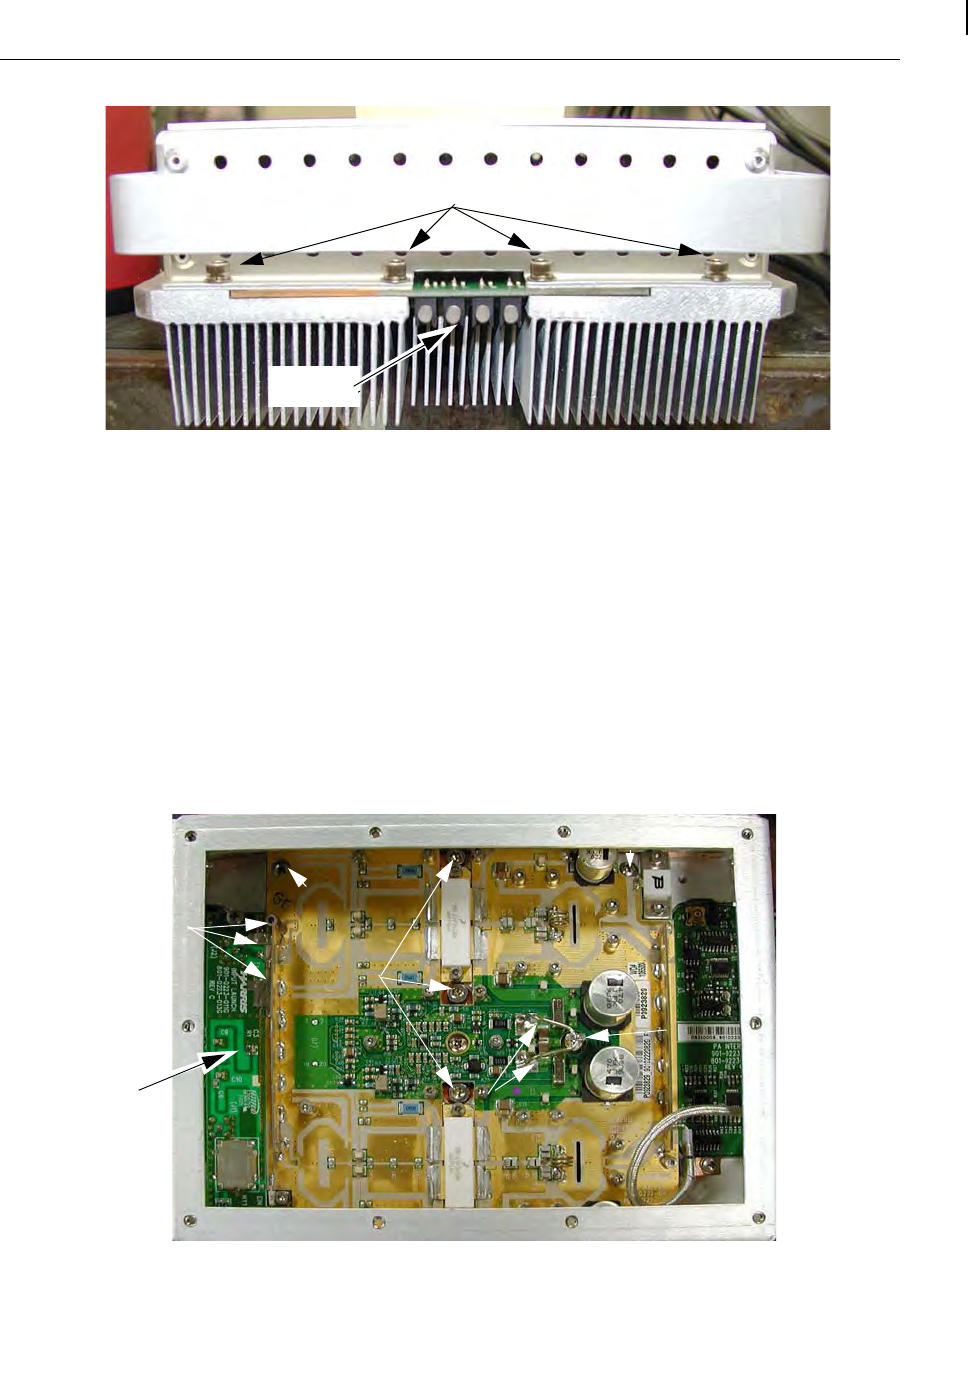
- 5.10.8 PAPalletReplacement 245
- 5.10.9 PABFanReplacement 249
- Endofprocedure 251
- 5.12 Hand ling 255
- 5.13 TypicalTestEquipment 256
- Section-6 Diagnostics 257
- Table6‐1PA&PSLEDs 258
- 6.3 WebBrowserFaultLog 259
- Red–ActiveFaults 260
- 6.5 FaultTables 261
- Table6‐3MODFPGAFaults 262
- Table6‐2UDCFaults 262
- Table6‐6DSPFaults 269
- Table6‐7PFRUFaults 269
- 6.5.2 UAXLPUPAFaults 273
- Table6‐9LPUPAFaults 274
- 6.5.3 UAXPABFaults 276
- Table6‐10PABFaults 277
- Section-7 Parts List 279
- ItemDescription PartNumber 280
- ItemDescription PartNumber 282
- Table7‐3TCU981‐0293‐018 284
© 2020, manymanuals.fr. Tous droits réservés | 0.024 s |
 Manymanuals.com
 Manymanuals.de
 Manymanuals.fr
 Manymanuals.it
 Manymanuals.pl
 Manymanuals.cz
 Manymanuals.es
 Manymanuals-pt.com
Commentaires sur ces manuels